> For the complete documentation index, see [llms.txt](https://docs.optty.com/llms.txt). Markdown versions of documentation pages are available by appending `.md` to page URLs; this page is available as [Markdown](https://docs.optty.com/widget/full-in-context-widget.md).

# Full In Context Widget

## Overview

The Full In Context Widget is a checkout surface that lets a payment method render its **native checkout UI** — PayPal buttons, hosted card fields, or provider-supplied payment SDKs — directly inline on your checkout page. The customer never leaves your site: no redirect, no popup, no external iframe navigation.

Unlike the [Create Order Widget](/widget/create-order-widget.md) flow — which requires a payment method to be selected before an order is created, then completes payment via a redirect or iframe popup — the Full In Context Widget renders the payment method's checkout controls first, then creates the order at the moment the customer confirms payment.

{% hint style="info" %}
Only payment methods configured with **Full Page** in the UPP (see [Step 4](#step-4-upp-configuration-enabling-full-page-for-an-apm)) will render in this widget. Which of your enabled payment methods support Full Page is listed in Optty's feature matrix.
{% endhint %}

## Step 1 - Widget Setup & Initialisation

<details>

<summary>Overview of <a data-mention href="/pages/rb4pokyK7PGbxzj3Pf9N">/pages/rb4pokyK7PGbxzj3Pf9N</a></summary>

### **1.1 Initiate Widget**

```javascript
<script>
  (function (w, d, s, o, f, js, fjs) {
    w['JS-Widget'] = o;
    w[o] = w[o] || function () { (w[o].q = w[o].q || []).push(arguments) };
    js = d.createElement(s), fjs = d.getElementsByTagName(s)[0];
    js.id = o; js.src = f; js.async = 1; fjs.parentNode.insertBefore(js, fjs);
  }(window, document, 'script', 'mw', 'https://widgets.qa.optty.com/widget-loader.js'));
</script>
```

### **1.2 Load configuration**

```javascript
<script>
    // … widget initiation script …
    mw('init', {
        token: {{CUSTOMER_WIDGET_TOKEN}},
        currency: "string",
        initialAmount: number,
        mode: "live"
    });
</script>
```

### **1.3 Setup Optty Full In Context Widget**

```javascript
<script>
    mw('optty-full-in-context-widget', {
        initialAmount: number,
    })
</script>
```

### **1.4 Retrieving Your Widget Token**

The `token` passed to `mw('init', ...)` is a **merchant-scoped JWT** — it identifies your merchant to the widget SDK and is safe to embed on public checkout pages. Retrieve it from the UPP:

1. Log in to `upp.qa.optty.com` (sandbox) or your production UPP URL.
2. In the top right, open the profile menu (**Hey \<username>**) and choose **View Profile**.
3. Copy the value shown under **Widget Token**. The same panel exposes your **Client ID** and **Client Secret**, used for the direct API endpoints described in [Verifying the Transaction](#verifying-the-transaction).

</details>

## **Step 2 - Embed the Widget Region**

Add an empty `div` with the `optty-full-in-context-widget` class where you want the payment method to render on your checkout page. The widget creates a self-contained iframe inside this element and dynamically resizes it to fit the payment method's UI.

```html
<div class="optty-full-in-context-widget"></div>
```

## Step 3 - Payload Field

Call the widget with the required payload structure. All order data is captured on the frontend and passed to Optty when the customer confirms payment inside the payment method's native UI.

**Parameters**

The widget has a few behaviours that differ from other checkout widgets — worth calling out before you build against it:

* The `purchaseCurrency` on the payload **must match** the `currency` you passed to `mw('init', ...)`. A mismatch fires `onError` immediately with a currency-mismatch message and no buttons render.
* You do **not** need to include a `bnplProvider` field. The widget sets it automatically based on which native control the customer interacts with.
* `autoCapture: true` (default) captures the payment immediately on customer approval. Setting `autoCapture: false` authorises the payment for manual capture later via the API.
* Merchant-initiated transactions (passing a merchant `token` inside `payload`) are not supported by the Full In Context Widget — the widget rejects these with an `onError` callback. Merchant-initiated transactions should be completed directly via the API, since they do not require customer input and therefore do not require a widget.
* At least one payment method with **Full Page** enabled in the UPP (see [Step 4](#step-4-upp-configuration-enabling-full-page-for-an-apm)) must match the `currency` on the init call. If no eligible payment method exists, `onError` fires with a "No eligible bnpls with FULL\_IN\_CONTEXT preferred display mode" message.
* The `dynamicCallbackUrl`, if provided, should be a valid HTTPS URL that receives webhook notifications about order status changes.
* `paymentStatusFetchEnabled` set to `true` includes a `payment` object in the `onFinalize` callback.

### Step 3.2 - Callback Functions

**onFinalize:** Called when the customer completes payment successfully inside the payment method's native UI. Receives an object containing `order` (Optty order details) and `payment` (payment result — status, amount, currency, provider, bnplOrderId, surcharge).

**onError:** Called when an error occurs — order creation failure, currency mismatch, no eligible payment methods, or a provider-side error inside the native UI. Receives `{ statusCode, message, error }`. Best practice: log the error, surface a message to the customer, and send unexpected errors to <support@optty.com> so we can follow up with the provider on your behalf.

{% hint style="warning" %}
`onError` may be invoked with `undefined` during the widget's normal initialisation lifecycle. Always guard against a falsy argument in your handler before logging or surfacing an error to the customer — e.g. `if (!err) return;` at the top of the callback. **Resolution currently in progress.**
{% endhint %}

**onCancel:** Called when the customer cancels payment inside the native UI (for example, closing the PayPal window or clicking Cancel). Receives `{ message, statusCode, orderReference, transactionReference, ...providerCancelData }` — the trailing fields depend on the provider's own cancel payload.

```javascript
<script>
    mw('optty-full-in-context-widget', {
        payload: {
          "locale": "en_AU",
          "orderReference": "{{YOUR_UNIQUE_REFERENCE}}",
          "orderAmount": 50,
          "taxAmount": 0,
          "shippingAmount": 0,
          "discountAmount": 0,
          "orderItems": [
            {
              "name": "Striped Silk Tie",
              "quantity": 1,
              "sku": "793775370033M",
              "unitPrice": 50,
              "totalAmount": 50
            }
          ],
          "purchaseCountry": "AU",
          "purchaseCurrency": "AUD",
          "customer": {
            "firstName": "Ben",
            "lastName": "Tester",
            "email": "tester1@optty.com",
            "phoneNumber": "+61491570156"
          },
          "autoCapture": true,
          "billingAddress": {
            "firstName": "Ben",
            "lastName": "Tester",
            "email": "tester1@optty.com",
            "phoneNumber": "+61491570156",
            "streetAddress": "1 Test St",
            "streetAddress2": "",
            "city": "Sydney",
            "country": "AU",
            "state": "NSW",
            "region": "NSW",
            "postalCode": "2000"
          },
          "shippingMethod": "digital",
          "shippingAddress": {
            "firstName": "Ben",
            "lastName": "Tester",
            "email": "tester1@optty.com",
            "phoneNumber": "+61491570156",
            "streetAddress": "1 Test St",
            "streetAddress2": "",
            "city": "Sydney",
            "country": "AU",
            "state": "NSW",
            "region": "NSW",
            "postalCode": "2000"
          },
          "cancellationTimeout": 8660,
          "paymentStatusFetchEnabled": true
        },
      onError: function(err) {
        // Handle error
        console.error({ err });
      },
      onCancel: function(cancel) {
        // Handle cancel
        console.log({ cancel });
      },
      onFinalize: function(data) {
        // Handle completion
        console.log('Payment completed:', data);
      }
    });
</script>
```

<figure><img src="/files/smkEDYP3GASL7U4VLk0O" alt="Example: PayPal Pay in 4 button rendered inline by the Full In Context Widget"><figcaption><p>Example — a PayPal Pay in 4 button rendered inline by the Full In Context Widget (AUD, sandbox)</p></figcaption></figure>

### Payload Field Requirements

Required fields vary between payment methods, but most Full In Context payment methods need only minimal customer information — the native provider UI typically collects the rest from the customer directly.

While integrating, the widget itself is the best source of truth. If a required field is missing or invalid on your payload, the widget will surface a validation error via the `onError` callback describing exactly what was missing or wrong. Iterate against those errors until the payload is accepted for each payment method you plan to support.

## Step 4 - UPP Configuration (enabling Full Page for an APM)

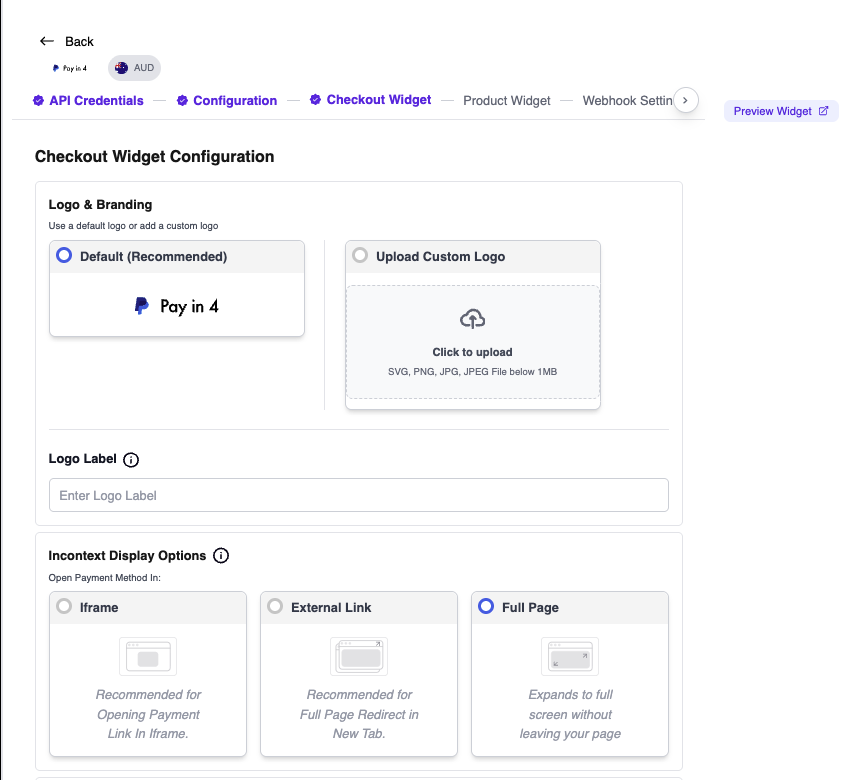
For a payment method to appear in the Full In Context Widget, the merchant administrator needs to enable **Full Page** on that method in the UPP.

**Steps**

1. Log in to the UPP for the relevant environment (sandbox: `upp.qa.optty.com`; production: your UPP URL).
2. Go to **Payments Management → Payment Methods**.
3. Find the payment method + currency row you want to enable (e.g. PayPal AUD, or PayPal Pay in 4 AUD) and click **Manage**.
4. Open the **Checkout Widget** tab.
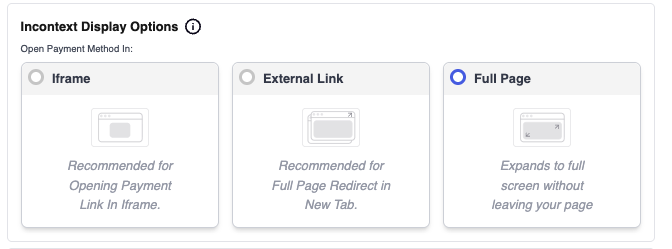
5. In the **Incontext Display Options** section, under **Open Payment Method In**, select **Full Page**.
6. Click **Save Changes**.

<figure><img src="/files/0n1YJzv1rZk3UvIoCdl3" alt="PayPal Pay in 4 Checkout Widget configuration in the UPP"><figcaption><p>Checkout Widget tab in the UPP — Payment Methods → Manage</p></figcaption></figure>

<figure><img src="/files/fqXUhUAVBotJ040jlPA2" alt="Full Page option selected under Incontext Display Options"><figcaption><p>Selecting Full Page under Incontext Display Options</p></figcaption></figure>

**Effect of selecting Full Page**

Selecting **Full Page** on a payment method **removes** it from the [Easy Checkout Widget](/widget/easy-checkout-widget.md) and [Create Order Widget](/widget/create-order-widget.md) surfaces and makes it available **only** inside the Full In Context Widget for that merchant. The three options under Incontext Display Options are mutually exclusive:

* **Iframe** — the payment method opens inside an Optty-hosted iframe in the Easy Checkout / Create Order widgets.
* **External Link** — the payment method redirects to the provider's page in a new tab from the Easy Checkout / Create Order widgets.
* **Full Page** — the payment method's native controls render inline via the Full In Context Widget.

If you want the same payment method to be available in more than one widget surface for the same currency, you cannot currently configure this — one payment method + currency combination has one display mode.

{% hint style="warning" %}
Selecting **Full Page** takes the payment method out of every other checkout widget. If the Full In Context Widget is **not** embedded on your checkout page, that payment method will not appear anywhere for the customer. Make sure the widget is present on the page(s) that customers will check out from before enabling Full Page on a live payment method.
{% endhint %}

## Verifying the Transaction

After a payment completes, you can verify the final state of the order server-side (independent of the `onFinalize` callback). Use the Optty direct API:

1. Exchange your **Client ID** and **Client Secret** for an access token — see [Create Access Token](/direct-api-orders/create-access-token.md). The base URL for each environment is listed in [Environments](/direct-api-orders/environments.md).
2. Call the [https://gitlab.com/optty/documentation/merchant-integration-docs/-/blob/master/direct-api-orders/get-orders.md](https://gitlab.com/optty/documentation/merchant-integration-docs/-/blob/master/direct-api-orders/get-orders.md "mention") endpoint with your `orderReference` (the same reference you passed on the widget payload).
3. Confirm the `status` on the returned order and payment records is a final state (e.g. `SUCCESSFUL`).

Alternatively, log in to the UPP and check **Reports & Analytics → Transaction Reporting**, searching by your merchant reference. Reporting can lag by a few minutes; the API is the fastest way to confirm.

## Live Test Harness

The fastest way to see the widget in action is the Optty widgets sandbox at <https://widgets.qa.optty.com/>:

1. Set **Mode** to **live**.
2. Paste your merchant's widget token into the **Insert Widget Token here** field.
3. Set **Currency** to a currency that has a Full Page–enabled payment method on your merchant (for example, **AUD** if you enabled Full Page on PayPal Pay in 4 AUD).
4. Click **Apply Config**.
5. Scroll to **#14 Full In Context Widget** and edit the Order Payload in the JSON editor. The widget re-renders on every change with the current payload.